Setting up a POS system for the first time can feel like a significant undertaking, but the process is more straightforward than most business owners expect. Cloud-based POS platforms are designed for self-installation, and most small businesses can go from unboxing to their first transaction in a single day.
This guide walks you through the setup process step by step, from preparing your hardware and configuring your business settings to testing every function before your first transaction. The specifics do vary depending on your POS provider, but the overall procedure follows the same general sequence regardless of the platform you’ve chosen. [Read about the best POS systems]
What do you need to set up your POS system?
Before doing anything, take a few minutes to gather everything you’ll need for the setup process. Having these items ready will save you from interruptions and backtracking when you’re in the middle of configuration.
You’ll need your POS hardware (terminal or tablet, card reader, and any peripherals like receipt printers or cash drawers), a stable internet connection (hardwired ethernet is recommended for your primary terminal, though Wi-Fi works for mobile setups), and your payment processing or merchant account credentials. You should also have your product catalog or menu ready to enter — either as a spreadsheet for bulk import or a written list for manual entry. Finally, gather your business details: legal business name, address, phone number, tax identification number, applicable sales tax rates, tip settings if relevant and your business bank account information for payment deposits.
If you have a logo file for receipts and customer-facing displays, have that accessible as well. Taking 15 minutes to organize this information before you start will make the entire process smoother. [Read related: top POS system features]
Step 1: Set up your hardware.
Start by unboxing and inspecting all of your hardware components. Confirm everything you ordered is present and undamaged. Position your primary terminal or tablet at the counter in a location that’s ergonomic for your staff and accessible for customers who will interact with the card reader or customer-facing display.
Connect your peripherals one at a time. Plug in your receipt printer, connect your cash drawer (which typically connects through the receipt printer via an RJ12 cable rather than directly to the terminal), attach your barcode scanner if applicable, and set up any kitchen printers or kitchen display systems. Connect your card reader to the terminal — this may be a physical cable connection or a Bluetooth pairing depending on your hardware.
Next, connect your terminal to your network. If you’re using a wired connection, plug an ethernet cable into the terminal or its dock. If you’re using Wi-Fi, you’ll configure the connection during the software setup process. Power everything on and confirm that the terminal recognizes all connected peripherals. Most POS systems display a status indicator for each connected device.
When everything is connected and working, label your cables and take a photo of the full setup. If you ever need to troubleshoot a connection issue or move the system, this reference saves time.
Step 2: Create your account and log in.
Most cloud-based POS systems require you to create an account through the provider’s website or directly on the terminal during initial setup. You’ll enter your business information, bank account details for receiving payment deposits and your tax identification number. This information is used both for your merchant profile and for payment processing.
If your POS provider has built-in payment processing (as is the case with Square, Toast, Shopify and others), your processing account is typically created as part of the same registration. If you’re using a separate third-party processor, you’ll need to connect your existing processing account to the POS platform during this step using the credentials or API keys your processor provides. [Read our Shopify vs. Square review]
Once your account is created, log in to the terminal. One of the first things you should do is check for software updates. New hardware often ships with software that’s several versions behind. Running the latest software ensures you have access to all current features, security patches and bug fixes before you start configuring.
Step 3: Enter your business settings.
With your account active and your terminal updated, move onto inputting your business settings. This is the foundation that everything else is built on, so take the time to get it right.
Enter your business name, address and phone number. Upload your logo if the system supports it — this typically appears on printed and digital receipts and on customer-facing displays. Set your sales tax rate based on your jurisdiction, and note whether your local tax rules require tax to be included in the displayed price or added at checkout.
If your business accepts tips, enter your tip settings now. Most systems let you enable tip prompting on the customer-facing display or on printed receipts and allow you to set suggested tip percentages (for example, 15 percent, 18 percent and 20 percent). Configure your receipt preferences as well — whether receipts are printed, emailed, texted or offered as a choice to the customer at checkout.
Set your operating hours, currency and language preferences. Operating hours may seem like a minor detail, but they’re relevant for reporting accuracy and, in some systems, for features like automatic end-of-day batch closing and employee scheduling.
Step 5: Set up employee access.
Create individual employee profiles for everyone who will use the POS system. Each employee should have their own unique login — typically a PIN code or a swipe card — rather than sharing a single account. Individual logins are essential for accountability, accurate tip tracking, sales attribution and security.
Assign role-based permissions to each employee profile. Most POS systems offer at least three permission levels: a cashier role with basic checkout access; a manager role with the ability to process refunds, apply discounts and view reports; and an admin or owner role with full access to all settings, financial data and system configuration. Limiting permissions by role protects against unauthorized discounts, unapproved refunds and accidental changes to system settings.
If your POS system includes time-tracking functionality, enable clock-in and clock-out at this stage. This allows employees to log their hours directly through the POS terminal, which simplifies payroll and gives you accurate labor cost data alongside your sales reports.
Step 7: Set up inventory tracking.
If your business tracks inventory, configure it now while your product catalog is fresh. Enter opening stock quantities for each product in your catalog. Set low-stock alert thresholds so the system notifies you when items need to be reordered — these will vary by product based on lead times and sales velocity, and you can refine them after a few weeks of real sales data.
Enable automatic inventory deduction so that each sale reduces the stock count of the sold items in real time. This keeps your inventory data current without requiring manual adjustments after each transaction. If you’re integrating with a separate inventory management platform, connect it at this stage and verify that data syncs correctly between the two systems.
Inventory setup is most critical for retail businesses that sell discrete, countable products. Restaurants often manage inventory differently — tracking ingredients by weight or volume rather than counting finished menu items — and not every restaurant POS supports ingredient-level inventory tracking. If ingredient-level tracking is important to your operation, confirm your POS system supports it before investing time in configuration. [Read about the best restaurant POS systems]
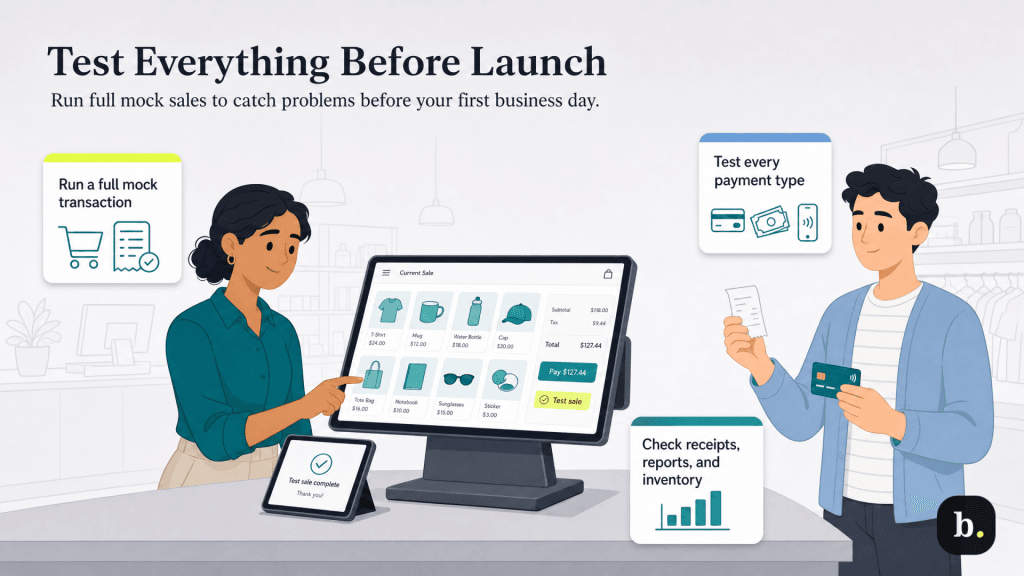
Step 9: Test everything.
Thorough testing before your first live business day is the most important step you can take to ensure a smooth launch. Run through every function your team will use on a typical day.
Process a mock transaction from start to finish: select items, apply any modifiers or discounts, accept payment and complete the sale. Test every payment type you accept. Confirm that receipts print or send correctly. Check that the sale appears in your reporting dashboard with the correct items, amounts and payment method. If you’re tracking inventory, verify that stock quantities are deducted correctly after the sale.
Test edge cases and exception scenarios: process a refund, void a transaction, apply a discount, split a payment between two cards and handle a cash transaction with change due. If you have multiple terminals, test each one independently.
One of the most revealing tests is to have a staff member who was not involved in the setup try to ring up a sale from scratch. If they struggle to find items, get confused by the workflow or can’t complete a transaction without help, you may need to simplify things before your launch.
Step 10: Train your staff.
Even the most intuitive POS system requires some training. Walk your staff through the things they’ll perform every day: ringing up a sale, processing different payment types, applying discounts and promotions, issuing refunds and voids, and handling returns.
Cover common scenarios that cause hesitation during sales: how to handle a declined card, how to process a split payment, how to look up a product that isn’t immediately visible in the catalog, and what to do if the receipt printer jams or the internet goes down. For managers, demonstrate how to access sales reports, make inventory adjustments, process end-of-day closeout procedures and generate the reports they’ll need for daily reconciliation.
Consider creating a one-page quick-reference guide or cheat sheet that you can post near each terminal during the first few weeks. This is especially helpful for businesses with part-time staff who may not use the system daily during the initial learning period.
If your schedule allows, plan to go live during a slower period rather than your busiest shift. A soft launch gives your team the opportunity to work through the new system at a manageable pace, ask questions in real time and build confidence before they need to perform under pressure. [Read related: Why businesses should do employee training]
What to consider after the POS system is set up
Once your system is live, the set up isn’t truly finished since the first 30 days are an optimization period. Run your end-of-day reports each night and reconcile them against your actual cash on hand and expected card deposits. Discrepancies in the first few days are common and usually trace back to set up issues (incorrect tax rate, missing item or a payment method not routing properly) that’s easy to fix once identified.
Review your product catalog regularly. Remove items you no longer sell, update prices as they change and add new products as they enter your inventory. Keep your software updated — most cloud-based POS systems offer updates automatically, but check periodically to ensure you’re running the latest version.
After about 30 days of use, revisit your entire setup. You’ll almost certainly find workflows to streamline: categories that should be reorganized, items that need better names for faster searching, modifier sequences that can be simplified or employee permissions that need adjusting. The insights you gain from real-world usage are far more valuable than anything you can anticipate during initial configuration.
How to successfully install your POS system
Setting up a POS system is a manageable process when approached methodically. The key is preparation: have your product data, business settings and payment processing credentials ready before you begin, and the technical set up itself will go smoothly. Most small businesses can complete the process in a day.
Invest extra time in two areas that pay disproportionate dividends: thorough testing before going live and proper staff training. A smooth first day on the new system builds confidence across your team and avoids the frustration and errors that come from employees learning through mistakes during a busy day. From there, treat the first month as a refinement period, and your POS system will quickly become a seamless part of your daily operations.