MENU
Starting a Business
- Best Small Business Loans
- Best Business Internet Service
- Best Online Payroll Service
- Best Business Phone Systems
Our Top Picks
- OnPay Payroll Review
- ADP Payroll Review
- Ooma Office Review
- RingCentral Review
Our In-Depth Reviews
Finance
- Best Accounting Software
- Best Merchant Services Providers
- Best Credit Card Processors
- Best Mobile Credit Card Processors
Our Top Picks
- Clover Review
- Merchant One Review
- QuickBooks Online Review
- Xero Accounting Review
Our In-Depth Reviews
- Accounting
- Finances
- Financial Solutions
- Funding
Explore More
Human Resources
- Best Human Resources Outsourcing Services
- Best Time and Attendance Software
- Best PEO Services
- Best Business Employee Retirement Plans
Our Top Picks
- Bambee Review
- Rippling HR Software Review
- TriNet Review
- Gusto Payroll Review
Our In-Depth Reviews
- Employees
- HR Solutions
- Hiring
- Managing
Explore More
Marketing and Sales
- Best Text Message Marketing Services
- Best CRM Software
- Best Email Marketing Services
- Best Website Builders
Our Top Picks
- Textedly Review
- Salesforce Review
- EZ Texting Review
- Textline Review
Our In-Depth Reviews
Technology
- Best GPS Fleet Management Software
- Best POS Systems
- Best Employee Monitoring Software
- Best Document Management Software
Our Top Picks
- Verizon Connect Fleet GPS Review
- Zoom Review
- Samsara Review
- Zoho CRM Review
Our In-Depth Reviews
Business Basics
- 4 Simple Steps to Valuing Your Small Business
- How to Write a Business Growth Plan
- 12 Business Skills You Need to Master
- How to Start a One-Person Business
Our Top Picks
PowerShell Basics: Programming With Loops
Table of Contents
PowerShell is a great tool for programmers and nonprogrammers alike. The ability to automate both simple and complex scripts is invaluable to businesses. One of the more difficult aspects of automation is writing loops for your scripts. Loops are essential to automating time-consuming, mundane tasks.
In this PowerShell tutorial, we’ll show you how to use the For loop, ForEach-Object loop, and the While, Do-While and Do-Until loops.
What is PowerShell?
PowerShell is an open-source scripting language that’s used to design efficient scripts and tools to assist people in their daily work tasks. PowerShell was originally designed with the intention of being easy to understand, so it’s great for people who may not be familiar with software programming.
PowerShell has two primary functions: a command-line shell that is similar to the Windows command prompt (known as “cmd.exe”) and a robust scripting language that can be molded to automate practically anything you might need.
In 2002, Jeffrey Snover, who worked for Microsoft at the time, knew that the command-line interface for Windows was not as capable as Linux, Microsoft’s competitor. To solve this problem, he created a document outlining his plans for a program that could improve upon the old command lines. Thus, PowerShell was born.
The program was such a success during the three-year implementation at Windows that PowerShell became the default installation on all Windows platforms beginning with Windows 7 in 2009. [Read related article: How to Install Windows Patches With PowerShell for Free]
Much like other shells, PowerShell has binary commands to execute most actions. For example, you can run commands to read files, ping computers and remove registry keys. PowerShell also includes cmdlets, which are compiled binaries that allow users to build the tools necessary for their scripts. PowerShell follows a verb-noun syntax, in which command names always start with verbs and have a hyphen in the middle and a noun at the end. The verbs describe the action the cmdlet will perform. For example, Copy-Item copies a file, and Get-Content gets text from a file.
If you’re not sure which verb you’re looking for, try Get-Verb to see a list of accepted verbs. Although there aren’t any approved nouns in PowerShell, you can get a list of available objects that are counted as nouns by filtering through the Get-Command function. [Read related article: Understanding Functions in PowerShell]
Programming with loops
PowerShell loops, at their most basic, simply repeat a set of commands a certain number of times. Ideal for performing consistent actions for a set period of time or a certain number of records, loops can simplify scripts and build interactive menus. In particular, PowerShell features cmdlets — notably, those that begin with the verb Get — that return objects containing large numbers of similar data.
There are several loop types available in PowerShell, and in many cases, more than one loop technique can be used effectively. At times, you must determine the most efficient loop type, from either a performance or code readability perspective.
ForEach-Object loop
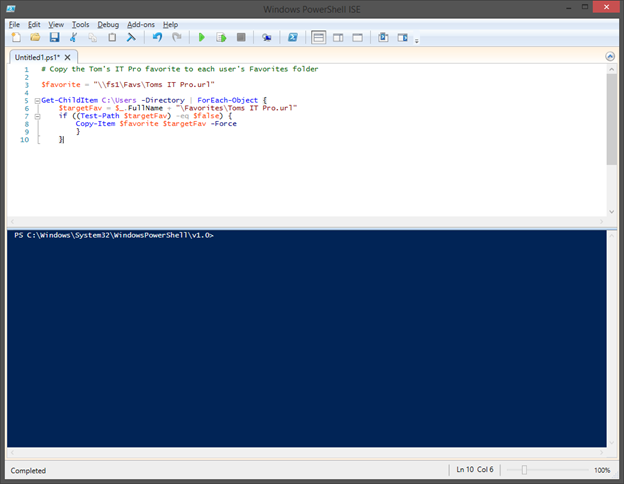
In many cases, using the ForEach-Object cmdlet is the best way to loop through an object. In its simplest form, ForEach-Object requires only an object to be looped through and a script block containing the commands to be performed on each member of the object.
These parameters can be specified either by the -InputObject and -Process parameter names or by piping the object to the ForEach-Object cmdlet and placing the script block as the first parameter. To illustrate this basic syntax, the following example shows two methods of using ForEach-Object to loop through the contents of a user’s Documents folder:
$myDocuments = Get-ChildItem
$env:USERPROFILEDocuments -File
$myDocuments | ForEach-Object {$_.FullName}
ForEach-Object -InputObject
$myDocuments -Process {$_.FullName}
In certain scenarios, it may be beneficial to perform one or more actions just before or just after the loop is performed. The -Begin and -End parameters can be used to define script blocks to execute just before or after the contents of the -Process script block. This can be used to set or modify a variable before or after the execution of the loop.
ForEach-Object has two aliases — ForEach and % — and supports shorthand syntax beginning in PowerShell 3.0. The following three examples are identical in function:
Get-WMIObject Win32_LogicalDisk | ForEach-Object {$_.FreeSpace}
Get-WMIObject Win32_LogicalDisk | ForEach {$_.FreeSpace}
Get-WMIObject Win32_LogicalDisk | % FreeSpace
PowerShell For loop
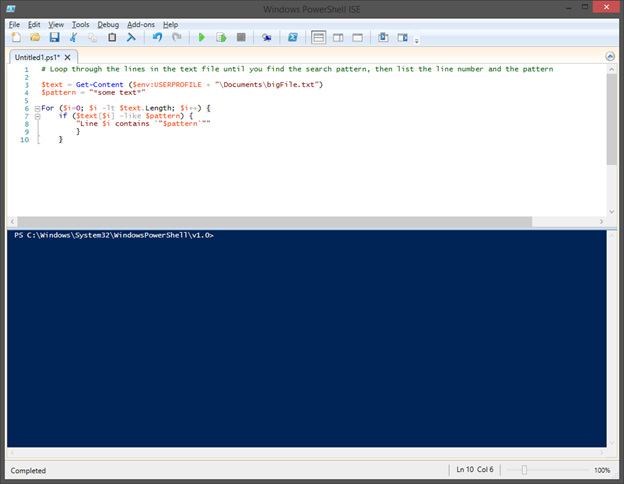
For loops are typically used to iterate through a set of commands a specified number of times, either to step through an array or object or to repeat the same block of code as needed. A For loop is constructed by setting the value of a variable when the loop is entered, the condition on which the loop should be terminated, and an action to be performed against that variable each time through the loop.
The following example shows a basic For loop used to create a multiplication table:
For ($i=0; $i -le 10; $i++) {
“10 * $i = ” + (10 * $i)
}
You can use For loops to step through array values by setting the initial value to the initial index of the array and incrementally increasing the value until the array length is met. The array index is specified by placing the incremented variable inside square brackets immediately following the variable name, as shown in the following example:
$colors = @(“Red”,”Orange”,”Yellow”,”Green”,”Blue”,”Indigo”,”Violet”)
For ($i=0; $i -lt $colors.Length; $i++) {
colors[$i]
}
While, Do-While and Do-Until loops
The third type of loop that PowerShell supports involves setting a condition that allows the loop to process either as long as the condition is true or until it is met. Both While and Do-While loops are used to perform an action while the condition evaluates to $true, and they differ only in their syntax. Do-Until loops have a similar syntax as Do-While loops, but they stop processing once the condition statement is met.
Both Do-While and Do-Until loops begin with the Do keyword prefacing a script block and are followed by the condition keyword (While or Until) and the condition. As an example, the following two loops function identically; only the condition is reversed:
$i=1
Do {
$i
$i++
}
While ($i -le 10)
$i=1
Do {>
$i
$i++
}
Until ($i -gt 10)
Although While loops and Do-While loops perform identically, the syntax is altered slightly. While loops use only the While keyword, followed by the condition and the script block. This loop is identical in function to the preceding examples, and it uses the same condition as the Do-While loop:
$i=1
While ($i -le 10)
{
$i
$i++
}
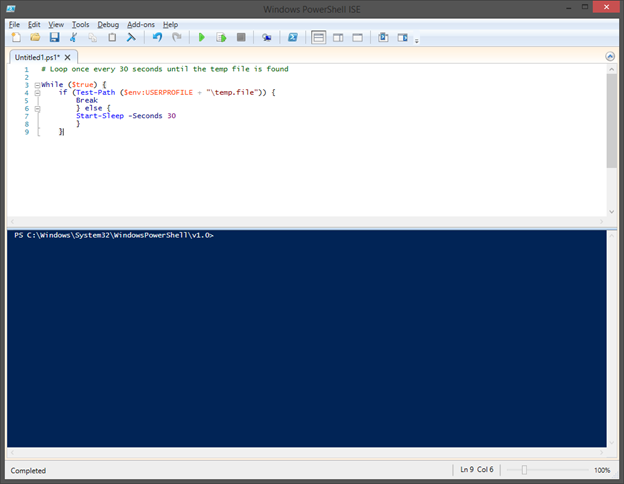
Any of these three loop types — Do-While, Do-Until and While — can also be used to loop indefinitely: While and Do-While loops with the condition set to $true and Do-Until loops with the condition set to $false.
In some situations, you may need to exit a loop early based on something other than the loop’s condition. In this case, the Break keyword can be invoked to exit the loop. This final example shows the same functionality, but it uses an infinite loop and the Break keyword to exit at the appropriate time:
$i=1
While ($true)
{
$i
$i++
if ($i -gt 10) {
Break
}
}
Why businesses should use PowerShell and loops
One of the benefits of customer relationship management (CRM) systems and the best electronic medical record (EMR) platforms is their ability to automate repetitive tasks and workflows. One drawback is that when customizing your system, you must stay within the set parameters.
PowerShell loops — such as For, ForEach-Object, While, Do-While and Do-Until — give you much greater freedom and control. They allow you to automate data entry, process large data sets on a scheduled basis, and integrate various systems exactly the way you want.
The less time you and your staff spend on repetitive, mundane tasks, the more time you have to think and act strategically to grow the business.
Mark Fairlie and Sean Peek contributed to this article.