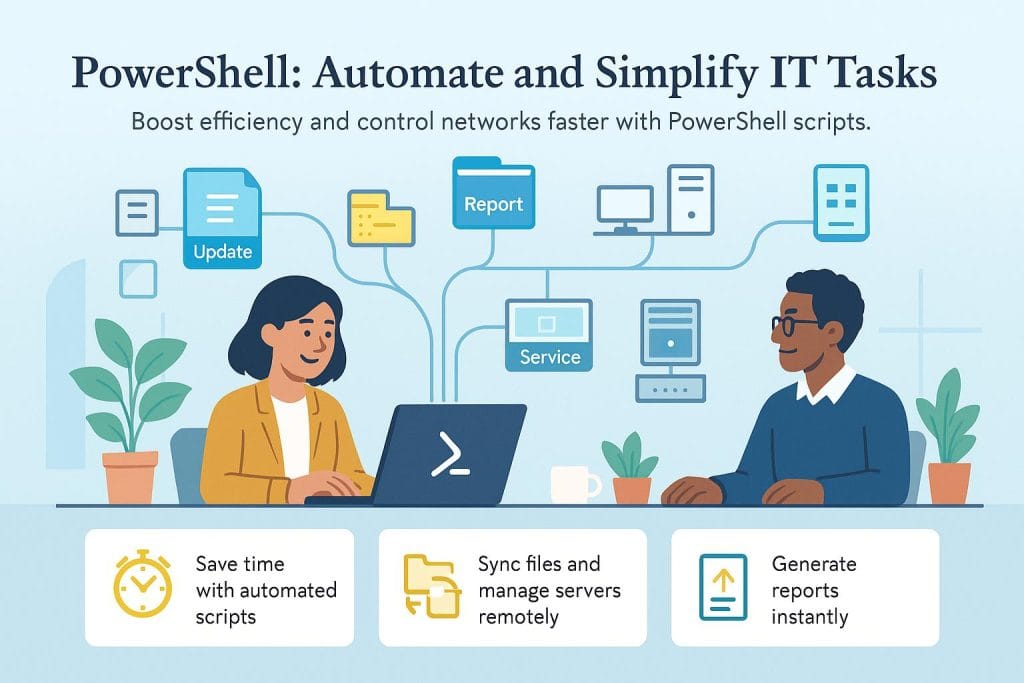
PowerShell can be an information technology (IT) admin’s best friend if they know how to use it properly. Created by Microsoft over a decade ago, this object-oriented automation engine allows IT professionals to automate administrative tasks and manage systems. The tool is open source and natively installed on all Windows client and server operating systems. However, PowerShell can function as a scripting language for Microsoft- and non-Microsoft-based software.
System and IT admins can benefit from using Powershell as it offers the capability to eliminate time-wasting, monotonous tasks by automating them into an efficient system. While its impact may not be apparent to all employees, the effects of Microsoft PowerShell can touch all departments within a business, from marketing to accounting.
How to use PowerShell tools, commands and modules
As with most things in life, taking the time to learn and fully understand the basics will go a long way toward avoiding headaches and will help you grasp more advanced concepts as you dive deeper into the world of PowerShell commands. The three concepts introduced in this section are fundamental to understanding the key concepts that form the basis of PowerShell.
PowerShell Tools
PowerShell is installed by default in Windows 11, Windows 10, Windows 7, Windows Server 2008 R2 and later versions of Windows. More recent versions of PowerShell introduced new features and “cmdlets” (Microsoft’s term for PowerShell commands ― pronounced “command-lets”). Releases up to PowerShell 5.1 are installed using the corresponding Windows Management Framework (WMF). The cross-platform PowerShell 6 and 7 lines install via MSI, WinGet or the Microsoft Store. Currently, WMF 5.1 is the latest version recommended for production use. In some cases, several new features depend on the operating system as well as the WMF version. For instance, Windows 11 and Windows Server 2022 include the Test-NetConnection cmdlet, which lets you test connectivity to a specific TCP/IP port, but this cmdlet is not available in Windows 7, even when you install the latest WMF version.
On most Windows systems, users will have the availability of two PowerShell environments: the PowerShell console and the PowerShell ISE (Integrated Scripting Environment). The PowerShell console appears like the traditional command line, but with the full weight of PowerShell behind it. Variable names, loops, tab completion and piping are all available from the PowerShell console. For more in-depth use, such as script building, the PowerShell ISE offers tab completion, code highlighting and Microsoft’s Intellisense code completion capability to assist you in creating and testing your PowerShell code. The PowerShell ISE also allows you to work with multiple PowerShell scripts simultaneously using tabbed navigation.
PowerShell commands and cmdlets
The basis of PowerShell commands are cmdlets. Microsoft made several design strategies when designing PowerShell cmdlets. First is the ability to infer cmdlet names easily or at the very least make them easy to discover. PowerShell commands or cmdlets, are also designed to work with standardized syntax, making them easy to use interactively from the command line or to create powerful scripts.
PowerShell cmdlets use the Verb-Noun format as in Get-Service, Stop-Service or Import-CSV. The verb portion of the cmdlet name indicates the action to be performed on the noun. Typically, cmdlets used to request information use the Get Verb as is the case with Get-Process or Get-Content. Commands used to modify something usually begin with the verb Set while those adding a new entity to something often begin with Add or New. In many cases, these verb-noun combinations can be guessed or predicted because of the standard naming convention.
Standardized cmdlet naming isn’t the only aspect of PowerShell designed to improve command line usability. Parameters commonly used throughout PowerShell also use standard names. One example of this is the -ComputerName parameter, which allows a cmdlet to be executed against one or more remote computers. Likewise, -Credential is used to provide a credential object, containing a user’s login credentials, to run the command as a specific user.
A PowerShell cmdlet is a single command that performs an action, typically either to request information, modify something or add a new entity.
PowerShell modules
When using PowerShell via the console, aliases can be used for both cmdlets and parameters to conserve keystrokes and shorten the overall length of a command (an advantage that should not be overlooked when piping commands together). Cmdlet aliases do not always use a standard naming convention. However, they do often mirror traditional command line utilities.
In PowerShell, the aliases DIR, CD, DEL and CLS correspond to the Get-ChildItem, Set-Location, Remove-Item and Clear-Host cmdlets, respectively. Parameter aliases can work in two ways: They can utilize a predefined alias defined by the cmdlet or they can be aliased by entering enough characters to result in a unique match among the cmdlet’s supported parameters.
Managing files and folders
Regardless of your niche in the IT industry, chances are some part of your daily grind involves managing files and folders in some way. Whether it’s moving folders to another location on a server, archiving log files or looking for large files, almost every system administrator spends part of their day managing files and folders. In cases where repetitive tasks are being repeated on multiple files or the same set of tasks are run repeatedly, automation through PowerShell can be a timesaver.
“You can manage thousands of files at once with a single command, and PowerShell’s file management is superior to navigating through folders,” explained web developer Vincent Schmalbach. “The true benefit is integrating logic with file operations, such as automatically organizing downloads by type or producing disk usage reports that would require hours of manual compilation.”
Jeremy Manuel, senior cybersecurity solutions architect at Myriad360, shared that in his industry controlling who has access to what is essential. “PowerShell lets you script and enforce file and folder permissions consistently across your environment,” he said. “Whether you are auditing access to sensitive data or cleaning up over-permissioned shares, it replaces the guesswork and reduces human error in access control.”
Finding files and folders is one of the first command line tools administrators would learn in the olden days of computers was the dir command. For those new to the game, dir would list the files and folders contained within the specified directory. PowerShell features a similar command in the form of the Get-ChildItem cmdlet. Get-ChildItem allows you to build a listing of the files quickly in a directory in a way that you can then act on these files either through a piped command or by assigning the output to a variable.
At its most basic, Get-ChildItem can be used simply by providing a path, either through the pipeline, using the -Path parameter or immediately following the cmdlet name. To tune the response returned by Get-ChildItem, it is key to look at some of the parameters made available by the cmdlet.
The -Filter parameter is one way you can search for files. By default, the Get-ChildItem cmdlet returns only direct children of the target directory. This functionality can be expanded using the -Recurse switch, which recursively searches directories contained within the current folder.
In PowerShell 4.0, Get-ChildItem adds the ability to limit the result to either a file or folder by using the ― File or ― Directory switches. Prior versions of PowerShell had to pipe the result to Where-Object, filtering on the PSIsContainer property to make this determination. An example of both techniques being used to return the folders contained in C:Users is shown here:
Get-ChildItem C:Users -Directory Get-ChildItem C:Users | Where-Object {$_.PSIsContainer –eq $true}
To discover hidden or system files the -Force switch must be used. Get-ChildItem in PowerShell 4.0 and above can also be used to return only those files that are hidden, read-only or system files using the -Hidden, -ReadOnly and -System switches, respectively. The same functionality can be achieved in prior versions by filtering on the Mode property using Where-Object:
Get-ChildItem C:Users | Where-Object {$_.Mode-like ‘*R*’}
Checking if a file exists
Often when working with files, all we need to know is whether a file exists or a folder path is valid. PowerShell offers a cmdlet to perform this validation in the form of Test-Path, which returns either a true or false value.
Often, Test-Path is useful as a precautionary step before attempting to copy or delete a particular file.
Copying, moving and deleting files
As you would expect, PowerShell is fully capable of performing standard file operations on numerous objects in a single pass. The Copy-Item cmdlet can be used to copy one or more files or folders from one location, identified by the -Path parameter, to the location specified by the -Destination option.
Likewise, the Move-Item cmdlet is used when relocating a file or folder. When a folder structure is being copied or moved, the -Recurse switch should be used to have the cmdlet perform the action on the folder and its contents. In some cases, the -Force switch is needed, such as when a read-only file is being overwritten by the copy operation.
Files and folders can be deleted using the Remove-Item cmdlet. As is the theme with many of the cmdlets discussed here, the -Force switch must be used when hidden or read-only files are encountered and -Recurse should be used when deleting a folder and its contents.
To ensure commands and scripts are error-free, testing them by using -WhatIf is recommended. Doing so can ultimately save you and your company a lot of trouble by detecting errors before the command or script runs.
Using PowerShell -WhatIf and -Confirm
It’s been said of scripts that they enable people to do stupid things extremely quickly. Before you pull the trigger on a big delete operation, make use of the -WhatIf switch offered for the majority of the cmdlets discussed here.
The -WhatIf switch allows you to see what will happen if you run the script or command, without the potential negative effects of deleting critical business data. It’s also worth noting that -WhatIf isn’t limited to file operations as it’s widely used throughout PowerShell.
For scripts that you intend to manually run or, worse, have a subordinate run manually, consider using -Confirm. This allows you to require user interaction prior to the operation taking place. Often, this is preferable to assuming everything is ready to go, such as file backups complete and replication disabled, prior to large file operations being initiated.
Objects, piping, filtering and more
The key to PowerShell, in addition to the standardized naming and other features that make it intuitive, is that many of the cmdlets are object-based. By working with objects, PowerShell allows you to easily make changes to multiple items with a single line of code, make changes to a specific subset of items within thousands or use these objects to collect data or perform actions on other related objects.
Objects
Objects, for those not familiar with the terminology, refers to items that contain multiple attributes or properties, such as strings of characters, lists of information and numerical values. A good example of an object is a Windows process, retrieved using the Get-Process cmdlet, which contains several properties indicating the executable name, priority, central processing unit utilization and memory usage.
The Get-Member cmdlet can be used to explore objects and their member properties and methods. Not only will Get-Member show you the properties of an object and the data types they contain, but it will provide you with the object type as well, which can, in turn, be used to find other cmdlets, which can accept an object type. “Because of an object-oriented feature, retrieving attributes of files, folders and even processes becomes easy,” Lnu shared with the example of: (Get-Item “file.txt”).Length.
“Returns is the length of a file in bytes,” he added, “which seems very simple and intuitive compared to the following in Bash”:
filesize=$(stat -c %s file.txt)
echo “Size: $filesize bytes.”
Adding piping and filtering along with the object, he explained, can exert precise control to obtain the actual results. “Object-oriented scripting makes filtering easy when combined with piping,” he said. “For example, during troubleshooting, one might need to get all processes that have consumed more than 100 seconds of CPU time.” The script in PowerShell is:
Get-Process | Where-Object { $_.CPU -gt 100 } | Sort-Object CPU -Descending
This looks natural and understandable compared to the Bash script:
ps -eo pid,comm,etime,%cpu | awk ‘$4 > 10’ | sort -k4 -n
Piping
PowerShell allows you to leverage cmdlets and objects through a technique known as piping. Using the pipe character (|), you can select objects quickly and easily and then perform an action on them. A perfect example of piping is killing specific processes using Get-Process java | Stop-Process. Likewise, you can restart services using a single line, such as Get-Service spooler | Restart-Service.
Often cmdlets with the same noun will be used when piping, but the technique is not limited to cmdlets with the same noun. Using the object type returned using Get-Member, you can find other cmdlets that can be used to receive a piped command. The Get-Command cmdlet with the object type specified using -ParameterType will return a list of cmdlets that can accept the designated object type.
Filtering
There is a whole list of cmdlets in PowerShell used for performing heavy lifting with objects, specifically those with the Object noun. Many of these cmdlets are among the most commonly used cmdlets while others are used for more specialized tasks.
The Where-Object cmdlet allows you to limit or filter the object being passed to the pipeline. For example, the command Get-Service | Where-Object {$_.DependentServices -ne $null} will return a list of services that have dependencies. The syntax used with Where-Object is worth noting and applies to some of the other object cmdlets as well. The squiggly brackets are used to delineate a code block in PowerShell and, in this case, indicate the condition being applied to the object in the pipeline. The automatic variable $_ is used to indicate the current instance of the object being evaluated. PowerShell comparison operators use hyphenated formatting, so -eq (equals) is used to find an exact match with the word “Stopped” in our example.
For interactive use within the PowerShell console, using aliases can save time and effort. The Where-Object cmdlet makes use of the question mark (?). PowerShell 3.0 allows you to simplify your Where-Object syntax even more by removing the need for the script block and the automatic variable from the pipeline. In PowerShell 3.0, this command is equivalent to the one provided above: Get-Service | ? DependentServices -ne $null.
Acting on objects
ForEach-Object is used to perform an action on each instance of an object. From a syntax perspective, ForEach-Object is similar to Where-Object, with both the script block and automatic variables being used with both cmdlets. Where ForEach-Object excels is being able to perform tasks against each object instance that are too complex for simple piping. For example, you may need to list the file security for a file share, in which case you could use pipe the Get-ChildItem cmdlet to ForEach-Object and then use Get-ACL against the fullname parameter ($_.FullName) to list the file security for the list of files.
As with Where-Object, the ForEach-Object cmdlet can be simplified using an alias, indicated with the percent sign (%). Also, the PowerShell 3.0 syntax is supported to provide even more intuitive use.
While filtering an object or performing an action on instances of an object are both common tasks, it’s a good idea to avoid both Where-Object and ForEach-Object when possible. Many cmdlets offer a -Filter option or other parameters that can help limit the number of results without having to look at each instance of an object, typically resulting in a significant performance improvement.
Likewise, ForEach-Object performs an individual action on each instance of the piped object. When possible, objects should be piped directly to cmdlets that can perform the required action on the entire object without having to enumerate each item within the object.
Schmalbach strongly recommended PowerShell for working with data because “it treats everything as objects rather than jumbled text output. You’re dealing with real process objects with properties like memory usage and CPU time when you obtain a list of running processes rather than parsing text. By grabbing all Chrome processes, filtering out those using more than 200MB of RAM, and sorting by CPU usage, you can effortlessly pipe these objects between commands in one smooth chain.”
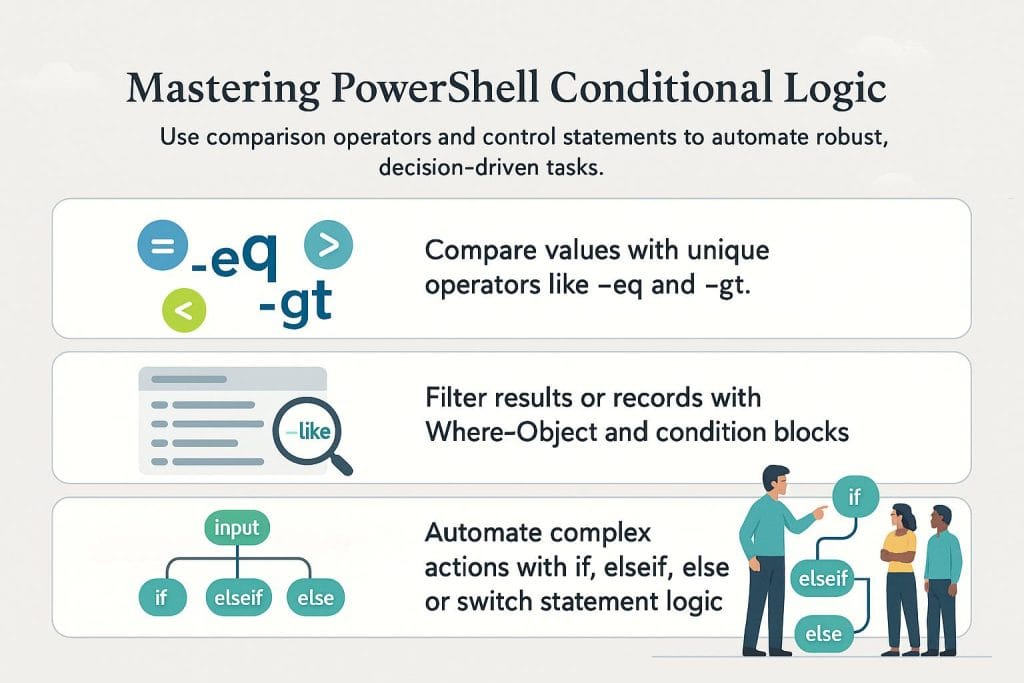
Comparison Operators and Conditional Logic
System administrators make decisions daily regarding what maintenance tasks to perform on servers based on numerous criteria. Automating repetitive administrative tasks with PowerShell frequently involves using logic to replicate this decision-making process. Several techniques can be used to achieve the desired results using comparisons, filters and conditional logic.
“Powershell has real value by building logic into scripts and reacting to what the system gives you,” Manuel said. “Use cases can range from verifying patch installs to conditionally triggering alerts. Its automation allows it to think before it acts.”
PowerShell comparison operators
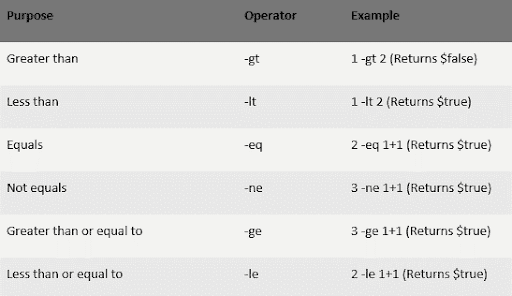
You won’t get far in creating PowerShell scripts without performing conditional logic, which begins with comparing values. The ability to check if a user exists, if a file has been created or if one computer can connect to another all require a comparison to a value. The one big gotcha in PowerShell has to do with syntax. Rather than using traditional comparison operators like < or >, PowerShell uses -lt or -gt to perform comparisons.
Several comparison operators are most commonly used with numerical values, although they have their place when working with dates or version numbers and other variable types as well. The following table contains the comparison operators most commonly used to compare numbers.
When comparing against text strings -eq can be used when an exact match is required. The -match operator can be used when looking for a portion of a string or -like can be used to perform wildcard searches. PowerShell can also be used to search for a particular value within an array by using -in, -notin, -contains or -notcontains.
In cases where more than one condition must be met, parenthetical statements can be used to manage groups of conditions. The following example can be used to select processes related to various web browsers:
Get-Process | Where-Object {($_.Name -eq “iexplore”) -or ($_.Name -eq “chrome”) -or ($_.Name -eq “firefox”)}
PowerShell Where-Object
Many common PowerShell cmdlets return a long list of values that are of little use as a whole. Using Where-Object allows you to quickly limit the results to the conditions you define within a scriptblock. The following example lists files in the current user’s profile that have the archive bit set:
Get-ChildItem $env:USERPROFILE -Recurse -Force | Where-Object {$_.Mode -like “*a*”}
This example shows the use of the $_ default variable, which is used to indicate the current record being passed from the pipeline. PowerShell 4 allows you to use Where-Object using aliases, such as ? or Where and accepts shortcut notation for the condition as well. This example is functionally identical to the one above:
Get-ChildItem $env:USERPROFILE -Recurse -Force | ? Mode -like “*a*”
If, elseif and else statements
One of the more common methods of controlling the flow of your script and performing conditional logic is through if statements. By setting first the criteria to be met and then the action to be taken, IT pros can automate complex administrative actions. In PowerShell, as in most programming languages, if statements can be used with elseif and else statements, which allow you to handle multiple scenarios.
A simple if statement requires the if keyword, followed by the condition in parentheses. When the condition evaluates as true, the code contained within the ensuing script block is then processed; if false, it is simply skipped. The following example shows a simple if statement that tests for internet connectivity:
if (Test-Connection www.google.com -Quiet) { Write-Host “Internet connection is live.” }
With the elseif statement, you can add further conditions to a single if statement. This differs from multiple if statements in that only the first condition met will be used. Else statements are placed at the end of an if statement to perform an action if none of the previous conditions are met. An example of a more complex condition with if, elseif and else blocks is below:
if (Test-Connection www.google.com -Quiet) { Write-Host “Internet connection is live.” } elseif (Test-Connection 192.168.0.1 -Quiet) { Write-Host “Only local network connectivity is available.” } else { Write-Host “Network connectivity is unavailable.” }
Switch statements
Like if statements, switch allows you to perform a set of commands when certain criteria are met. The big difference between if and switch is that switch statements evaluate a single set of criteria against multiple possibilities, rather than each statement evaluating a potentially unrelated set of criteria.
Switch statements begin with the switch keyword followed by the expression to be evaluated. A scriptblock enclosed in curly brackets follows the evaluated expression and contains the potential matches to be acted against. Each of these matches is followed by a scriptblock, which defines the actions to be taken when the condition is met. To perform actions against unmatched criteria, the default keyword can be used. This example uses the Get-Date cmdlet to read the day of the week and returns whether it is a weekday or the weekend:
switch ((Get-Date).DayOfWeek) { “Saturday” {“Weekend”} “Sunday” {“Weekend”} Default {“Weekday”} }
The previous example can be further simplified by using the -Wildcard option as shown below. Using wildcards with switch statements gives you a more efficient method of performing conditional actions.
switch -Wildcard ((Get-Date).DayOfWeek) { “S*” {“Weekend”} Default {“Weekday”} }
“With PowerShell, you can create intelligent scripts that make decisions based on actual conditions by using comparison operators like -eq, -lt and -contains,” Schmalbach told business.com. “Rather than executing the same command repeatedly, you can only restart services that are truly stopped or verify whether a file already exists before copying it. Remember that PowerShell uses -eq for equality rather than == like other languages do — this trips up many people when they first start using PowerShell.”
Using variables, arrays and hashtables
Windows PowerShell is all about making IT pros more efficient in their daily tasks. PowerShell is intuitive enough that entry-level or midtier admins can begin to learn the language, use cmdlets from the console and begin to write reasonably simple scripts.
Once your PowerShell scripts begin to become more complex, you’ll need to start working with aspects of PowerShell that will take you back to the programming classes you took in college. Variables in particular are essential for scripting because they enable you to pass information between parts of your script.
Manuel frequently uses PowerShell for variable arrays and has tables because it allows “you to adapt your scripts,” he said. “You can loop through items, track configurations or apply role-based settings. The flexible data structure allows you to codify and repeat policy.”
Assigning and Referencing PowerShell Variables
You’re probably familiar with the concept of variables on some level, whether it’s from prior experience in programming or mathematics. Values can be assigned to a variable to reference that variable throughout your PowerShell script. The use of variables allows you to ensure the value stays consistent throughout the script, makes it easier to change the value later (either manually or programmatically) and generally makes your script much more readable.
Variable names in PowerShell begin with a $, as in $UserName and values are assigned using =, like $UserName = “John Smith” or $UserAge = 42. PowerShell supports a huge number of variable types, such as text strings, integers, decimals, arrays and even advanced types like version numbers or internet protocol addresses.
By default, PowerShell will attempt to guess the variable type to be used, but this can be enforced by indicating the type before the variable name as in [int32]$UserAge=40. In cases where the assigned value does not match the enforced type, the value will be converted if possible or an error will be produced.
Occasionally, the need arises to dynamically assign or modify a variable’s value rather than simply assigning a static value. This could involve performing a mathematical operation on a number or adding text to a string. Numerical values can be assigned or modified using standard math operators like +, -, * and / as in the following examples:
$secondsPerDay = 24 * 60 * 60
$weeksPerYear = 365 / 7
Numerical values can also be incremented or decremented using ++ or – without having to add or subtract 1 from the value. These two examples have the same effect, increasing the value of the variable by 1:
$myNumber = $myNumber + 1
$myNumber++
PowerShell uses the addition operator (+) to concatenate or link text strings together. Later versions of PowerShell also support simply inserting a variable into a double-quoted string (as opposed to single quotes), although this technique should be used carefully to maximize backward compatibility.
$website = “www.business.com” $myString = “My favorite website is” + $website $myString = “My favorite website is $website”
Variables can also be used to retain information returned from cmdlets. This is particularly handy if your script calls for the same set of information to be used multiple times. Rather than running the same cmdlet multiple times, you can assign it to a variable and use it later in the script as often as you’d like.
PowerShell arrays and hashtables
Arrays are most often used to contain a list of values, such as a list of usernames or cities. PowerShell offers several forms of arrays, each of which can be assigned and accessed in distinct ways. For the purposes of this article, we’re going to focus on the two most commonly used. Basic PowerShell arrays can be defined by wrapping a list of items in parentheses and prefacing it with the @ symbol as in $nameArray = @(“John”,”Joe”,”Mary”). Items within an array can be accessed using their numerical index, beginning with 0, within square brackets like so: $nameArray[0].
A more advanced form of an array, known as a hashtable, is assigned with squiggly brackets prefaced by the @ sign. While arrays are typically (but not always) used to contain similar data, hashtables are better suited for related (rather than similar) data. Individual items within a hashtable are named rather than assigned a numerical index as in $user=@{FirstName=”John”; LastName=”Smith”; MiddleInitial=”J”; Age=40}. Items within a hashtable are accessed easily using the variable and the key name as in $user.LastName.
Default variables
One last thing of note about variables in PowerShell is that there are a host of default variables that have values assigned automatically. Several variables begin with the prefix “$env:” that can be leveraged to get things like the path to the Windows directory, temp folder, current user name or domain and many other types of system information. A full list of the $env variables can be acquired using the following command:
Get-ChildItem env:
Several other additional variables are available, such as $Home and $PsHome, which provide you the paths to the user’s home directory and the PowerShell home directory, respectively. The $Host variable returns an object containing information about the current PowerShell environment, whether it be the PowerShell ISE or the console. Finally, the $PSVersionTable contains information about the version of PowerShell installed, including $PSVersionTable.PSVersion.Major, which shows the major PowerShell version available on the host running the script.
The PowerShell values for the Boolean values of True and False are assigned to the $true and $false default variables automatically. Variables in PowerShell are versatile, according to Schmalbach. “You can use the $ prefix to store anything from plain text to whole collections of server data,” he said. “Lists of items (such as file paths or server names) that you can process in bulk or loop through are handled by arrays. For structured data, such as configuration settings, where key-value pairs must be stored and quickly retrieved, hash tables are ideal.”
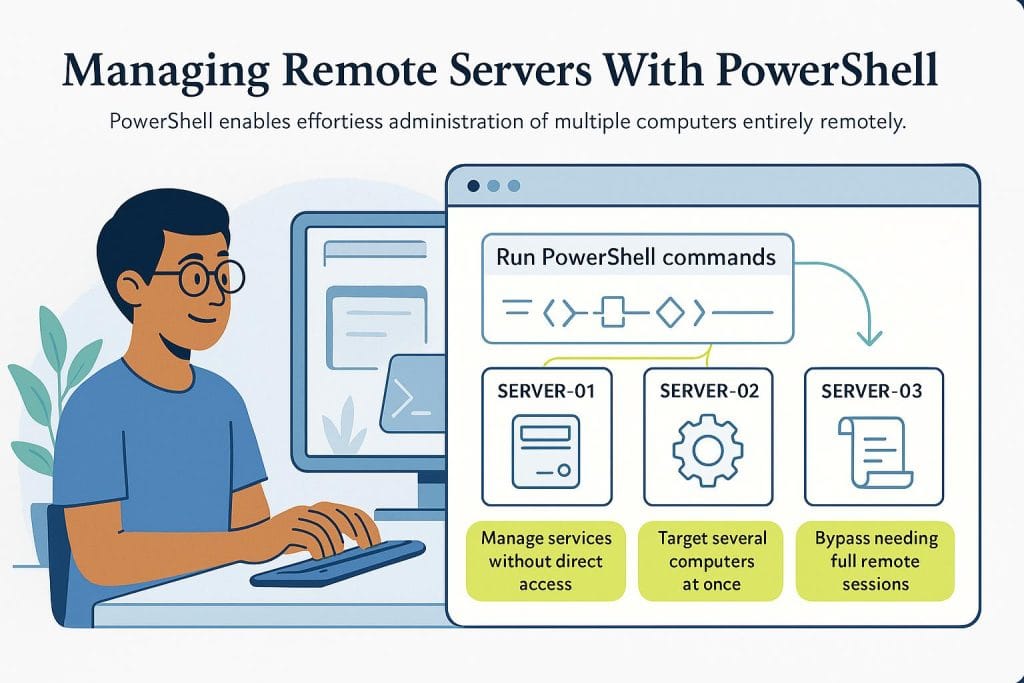
Managing remote servers and sessions
Enable PowerShell remote sessions
The big feature set introduced in PowerShell version 2.0 was the remoting feature. Using WinRM (Windows Remote Management), PowerShell remoting enables you to create a remote session to a computer. The functionality is similar to familiar remote administration tools, such as telnet and Secure Shell (SSH), but utilizes industry-standard ports and protocols, such as HTTP and SOAP.
Although most Windows systems on your network should have at least PowerShell 2.0 installed (it’s the default on Windows 7 and Windows Server 2008), PowerShell remoting is not enabled by default until Windows Server 2012. To enable PowerShell remoting the WinRM, service must be started and set to start automatically and a firewall rule must be enabled to allow communication to the server.
Fortunately, PowerShell remoting can be enabled in a single step using the Enable-PSRemoting cmdlet with the -Force switch from an elevated PowerShell prompt. Because Windows Server 2012 and later have PowerShell remoting enabled by default, there’s no need to run Enable-PSRemoting unless it has been disabled for some reason.
Please note that Microsoft no longer updates Windows Powershell 5.1 (its current iteration) with new features and that the support you receive from the company is based on the version of Windows you use.
Powershell, similarly named but a different product, runs on Windows, Linux and macOS and is built on the new versions of .NET instead of the .NET framework. Support for Powershell is tied to the version of .NET it’s built on.