Business.com aims to help business owners make informed decisions to support and grow their companies. We research and recommend products and services suitable for various business types, investing thousands of hours each year in this process.
As a business, we need to generate revenue to sustain our content. We have financial relationships with some companies we cover, earning commissions when readers purchase from our partners or share information about their needs. These relationships do not dictate our advice and recommendations. Our editorial team independently evaluates and recommends products and services based on their research and expertise. Learn more about our process and partners here.
PowerShell Basics: Programming With Loops
Learn how to automate repetitive business tasks using PowerShell's "for," "foreach," "while" and other loop types.
Written by:
Tim Ferrell, Senior Writer
Editor verified:
Gretchen Grunburg,Senior Editor
Last Updated Apr 01, 2026
Business.com earns commissions from some listed providers. Editorial Guidelines.
Table of Contents
A PowerShell “for” loop is a core scripting tool that lets you execute a block of code multiple times. Whether you’re automating system tasks or processing data, understanding how to write a “for” loop in Windows PowerShell — and how it compares to other loop types — can streamline your scripting and make it more efficient.
In this guide, we’ll walk through how to use “for,” “foreach” and “ForEach-Object” loops, along with “while,” “do-while” and “do-until.” We’ll also share expert-backed tips for using each effectively and flag a few common pitfalls to watch for.
Did You Know?
According to Stonebranch's 2026 Global State of IT Automation report, 67 percent of organizations now support more than 200 "citizen automators" (employees outside of IT who build or use automation tools), showing how automation is no longer limited to IT teams but is used across the business.
Syntax of PowerShell “for” loop
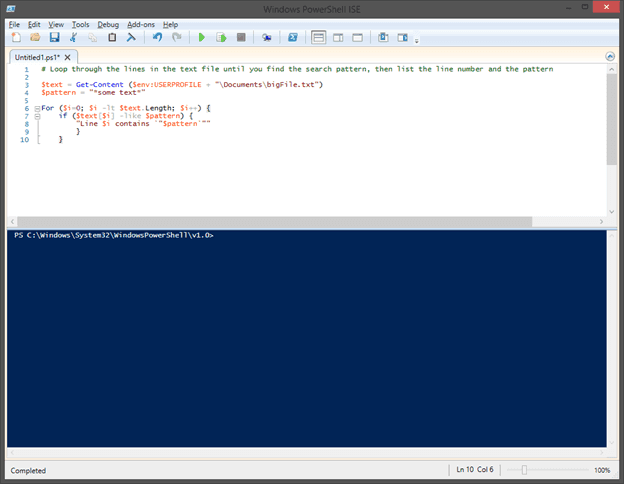
This PowerShell “for” loop reads a text file line by line and checks for a matching pattern, demonstrating how loops can automate repetitive search and data-processing tasks.
The “for” loop in PowerShell follows a specific syntax structure that makes it both powerful and easy to understand. “For” loops are typically used to run a block of code a set number of times, whether you’re stepping through an array or repeating the same task. Siva Padisetty, who worked on the development of PowerShell when he was a director at Microsoft in the early 2000s, explained that this construct is especially useful when you know exactly how many times you want to do something.
A “for” loop is constructed using three main components:
Initialization: Setting the value of a variable when the loop is entered
Condition: The condition on which the loop should be terminated
Increment/Decrement: An action performed on that variable during each iteration
The basic syntax follows this pattern:
For (initialization; condition; increment) { # Commands to execute }
The following example shows a basic “for” loop used to create a multiplication table:
For ($i=0; $i -le 10; $i++) {
“10 * $i = ” + (10 * $i)
}
You can also use “for” loops to step through array values by starting at the first index and incrementing until the array length is reached. The array index is specified by placing the variable inside square brackets immediately after the array name, as shown below:
Using loops in PowerShell starts with understanding the different loop types and choosing the one that best fits your task. In many cases, more than one approach will work, so the goal is to pick the option that balances performance with readability.
To implement a loop in PowerShell:
Identify what you want to repeat.
Determine how often it should run (either a set number of times or until a condition is met).
Choose the appropriate loop type.
Write the loop with your specific commands.
Test it with sample data before running it in a production environment.
FYI
PowerShell was launched for Microsoft Windows in 2006 and became available on macOS, Linux and other Unix-based operating systems starting in 2016. Microsoft continues to develop PowerShell as an open-source project, with PowerShell 7.6 as the current cross-platform version.
“for” loop with Windows PowerShell examples
Here are three realistic business scenarios that show how “for” loops work in PowerShell. Each example highlights how loops can automate everyday tasks, helping teams save time and reduce manual errors.
Example 1: Processing employee records
This example shows how you might process payroll information for multiple employees, such as employee data records used for payroll calculations. The loop ensures each record is handled consistently, helping reduce the risk of missed payments or data entry errors.
# Process payroll data for 50 employees
$employeeCount = 50
For ($i = 1; $i -le $employeeCount; $i++) {
Write-Host “Processing employee ID: $i”
# Add payroll calculation logic here
}
Example 2: Creating monthly reports
Accounting and finance teams often need to generate reports for each month of the year. This “for” loop automates that process, ensuring no months are skipped and the formatting remains consistent.
This example shows how to process files across multiple departments. The loop iterates through a predefined array of department names, ensuring each one is handled consistently — a useful pattern when onboarding new employees or reorganizing shared drives.
Other PowerShell loop types: “foreach,” “ForEach-Object,” “while,” “do-while,” “do-until”
PowerShell includes several loop types beyond the “for” loop, each designed for different use cases. Choosing the right one depends on your data, performance needs and how you want to structure your script.
“foreach” loop
The “foreach” loop in PowerShell is a language construct that lets you iterate over all items in a collection and run a block of code for each item.
Unlike the “ForEach-Object” cmdlet described below, the “foreach” loop loads the entire collection into memory before processing. This makes it faster for in-memory collections, but potentially more memory-intensive when working with large datasets.
The basic syntax follows this pattern:
foreach ($item in $collection) {
# Code to execute for each item
}
PowerShell automatically creates the $item variable during each iteration, assigning it to the current value in the collection. This makes it easy to work with arrays, lists and other collections without manually tracking your position.
This loop type is a strong fit when you have a defined list of items that need the same processing, such as updating employee records, generating invoices or working through a batch of customer orders.
The “foreach” loop is well-suited to scenarios where you have a defined collection and need to apply consistent operations to each item, whether that’s renaming files in a directory, updating database records or sending templated notifications. Because it processes the entire collection in memory, it typically runs faster than “ForEach-Object” for smaller datasets.
Did You Know?
Because loops perform consistent actions on a set of data, you can use a "foreach" loop to sync folders with PowerShell and automate file management tasks.
“ForEach-Object” loop
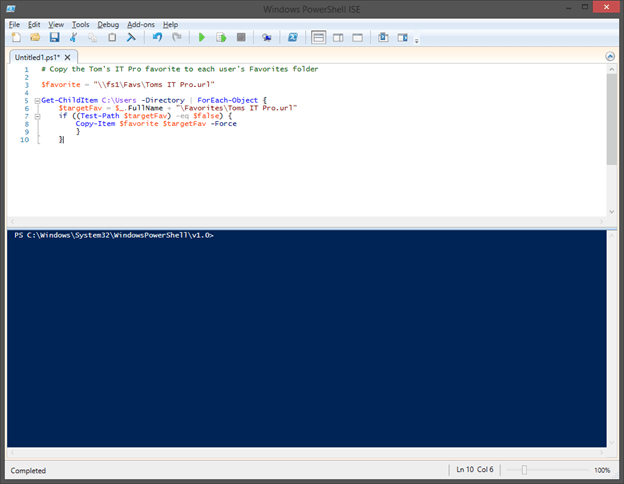
This example uses a ForEach-Object loop to copy a file into each user’s folder, showing how PowerShell can automate repetitive file management tasks across multiple directories.
The “ForEach-Object” cmdlet is most useful when you need to repeat the same task for each item in a collection.
“Imagine you have a basket of different fruits: an apple, a banana and an orange. You want to take each fruit out one at a time and take a bite,” Padisetty said. “The ‘ForEach-Object’ loop is like saying, ‘For each fruit in my basket, I’ll take it out and take a bite.'”
In many cases, the “ForEach-Object” cmdlet is the most practical way to loop through a collection of objects. In its simplest form, it requires an input object and a script block that defines the action to perform on each item.
You can pass input either by specifying parameters directly or by piping objects into the cmdlet.
In some cases, you may want to run actions before or after the loop executes. The “-Begin” and “-End” parameters let you define script blocks that run immediately before or after the “-Process” block. This is useful when initializing variables or performing cleanup tasks around the loop.
“while,” “do-while” and “do-until” loops
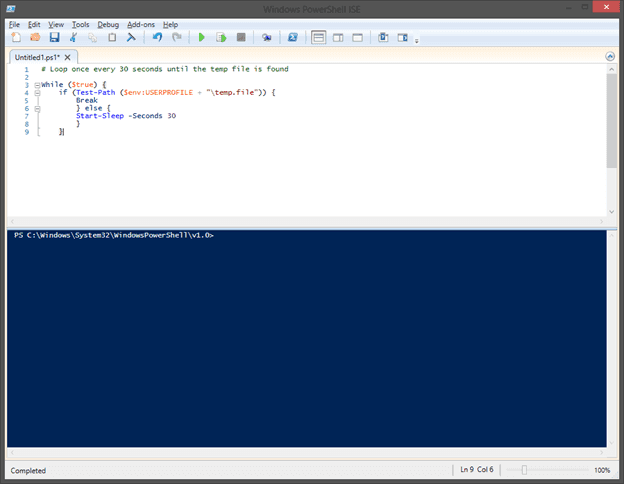
This example uses a “while” loop to repeatedly check for a file, pausing for 30 seconds between attempts.
PowerShell also supports loops that run based on a condition rather than a fixed number of iterations. These loops continue running based on a condition — either while it remains true or until it becomes true. Both “while” and “do-while” loops run as long as a condition evaluates to $true, while “do-until” loops run until the condition evaluates to $true.
“Do-while” and “do-until” loops share a similar structure: they begin with the do keyword followed by a script block, then end with a condition (while or until). The following examples produce the same result, only the condition is reversed:
$i = 1
Do {
$i
$i++
}
While ($i -le 10)
$i = 1
Do {
$i
$i++
}
Until ($i -gt 10)
$i = 1
While ($i -le 10) {
$i
$i++
}
Any of these loop types — “while,” “do-while” and “do-until” — can also run indefinitely. “While” and “do-while” loops will continue when the condition is set to $true, while “do-until” loops continue when the condition is set to $false.
“The key difference from ‘do-while’ is that ‘do-until’ keeps going until something becomes true, while ‘do-while’ keeps going as long as something is true,” Padisetty said.
In some situations, you may need to exit a loop early based on something other than the loop’s condition. In those cases, you can use the break keyword. The example below uses an infinite loop and exits once a condition is met:
Which PowerShell loop you use depends on what you’re trying to accomplish. Padisetty outlined when each loop is most appropriate.
Here’s a quick way to think about when to use each loop type:
Loop
When to use it
for
Use when you know exactly how many times something should run.
foreach
Use when you have a collection of items and want to process each one the same way.
ForEach-Object
Use when working with a pipeline or streaming data and you want to process each item as it’s passed through.
while
Use when you want something to keep running as long as a condition is true.
do-while
Use when you want to run something at least once and then continue while a condition is true.
do-until
Use when you want something to keep running until a condition becomes true.
Use cases for Windows PowerShell loop scripts
PowerShell loops are especially useful for automating repetitive tasks that would otherwise take up valuable time and increase the risk of human error. The following examples show how loops can streamline common business workflows.
File management and organization
Businesses often need to organize large volumes of files based on date, size or other criteria. This example uses a “ForEach-Object” loop to group files by year and month, helping automate routine file organization tasks.
Monthly sales reporting can be automated with “for” loops to ensure consistent formatting and full coverage across all time periods. This helps reduce the risk of missed months or inconsistent reports.
# Process monthly sales data
For ($month = 1; $month -le 12; $month++) {
# Calculate monthly totals and generate reports
Write-Host “Processing month $month sales data”
}
System administration tasks
IT teams can use “ForEach-Object” loops to monitor multiple servers at once, helping ensure consistent health checks across systems without manual intervention.
# Monitor server health across multiple systems
$servers = @(“Server1”, “Server2”, “Server3”)
$servers | ForEach-Object {
# Check disk space, memory usage and services
Write-Host “Checking health of $_”
}
Database operations
Database administrators can automate backups across multiple databases to help ensure nothing goes awry and everything follows consistent naming and storage rules.
# Backup multiple databases
$databases = Get-SqlDatabase
$databases | ForEach-Object {
# Create backup for each database
Write-Host “Backing up database: $($_.Name)”
}
FYI
Many popular business tools, including the best POS systems and best accounting software, offer APIs that can connect to PowerShell. You can take advantage of those integrations by using PowerShell to fetch or update data from connected platforms.
Best practices for using loops in PowerShell
Keep these guidelines in mind to build efficient, maintainable loops that hold up in real-world business environments:
1. Choose the right loop type.
Selecting the right loop helps keep your script efficient and easier to read. Here’s a guide:
Use “for” loops when you know the exact number of iterations.
Use “foreach” when you’re working with a collection already in memory.
Use “ForEach-Object” when processing data through a pipeline.
Use “while” loops for condition-based tasks.
2. Optimize performance.
Small changes inside a loop can have a big impact on performance. Consider the following:
Keep operations inside the loop to a minimum.
Use pipeline processing when it makes sense.
Avoid unnecessary variable assignments inside loops, especially when working with large datasets.
3. Include error handling.
Incorporating error handling into your loops is essential. Without it, a single failed operation can halt an entire script and disrupt automated workflows. Using a simple try/catch block helps keep things running and provides meaningful feedback when something goes wrong. For example:
$items | ForEach-Object {
try {
# Loop operations here
}
catch {
Write-Error “Error processing item: $_”
}
}
4. Use meaningful variable names.
Avoid generic names like $i or $x. Instead, use descriptive names that reflect what the loop is working with, such as $service or $report.
5. Add comments and documentation.
Explain the loop’s purpose and expected behavior, and document any complex logic within it so others (and even your future self) can easily understand and maintain your script.
6. Test with small datasets first.
Verify your loop logic before running it against large datasets, and use the -WhatIf parameter when available to test changes safely.
Common loop mistakes and debugging tips
Understanding common pitfalls can save time and help prevent system issues. Here are a few issues you may encounter and how to fix them:
Infinite loops
Problem: A loop condition that never becomes false
Solution: Always verify your exit conditions and include a safety limit.
# Bad: Infinite loop
While ($true) {
# Missing break condition
}
# Good: Safe loop with exit condition
$counter = 0
While ($condition -and $counter -lt 1000) {
$counter++
# Loop logic here
}
Off-by-one errors
Problem: A loop runs one time too many or one time too few.
Solution: Double-check your starting value and termination condition.
# Common mistake: Misses the last item
For ($i = 0; $i -lt $array.Length – 1; $i++) {
# Loop logic here
}
Memory issues with large datasets
Problem: Processing too much data at once
Solution: Use streaming or batch processing
# Process files one at a time instead of loading everything into memory
When loops don’t behave as expected, a few simple debugging techniques can help you quickly identify and fix the issue. These approaches make it easier to track what’s happening during each iteration and catch problems early.
Use Write-Host or Write-Output to track loop progress: Add these commands inside your loop to display current values, iteration counts or processing status. This helps you pinpoint where a loop may be failing or behaving unexpectedly.
Add breakpoints in PowerShell ISE or Visual Studio Code: Set breakpoints on specific lines within your loop to pause execution and inspect variable values at each step. This allows you to walk through the code and identify logic errors.
Use the -Verbose parameter for more detail: Many PowerShell cmdlets support verbose output that shows additional information during execution, helping you understand why a loop isn’t producing the expected results.
Test with small sample datasets first: Start with a subset of your data (such as the first 10 items) to confirm your loop works as expected before running it at full scale.
Code formatting tips for editors
When presenting PowerShell loop code in articles or documentation, proper formatting improves readability and helps ensure your content displays correctly across platforms:
1. Use <pre><code> tags or markdown code blocks.
This ensures code is clearly separated from the surrounding text and displays correctly.
# Loop from 1 to 5
for ($i = 1; $i -le 5; $i++) {
Write-Host “Number $i”
}
2. Format code blocks with triple backticks and a language label.
Adding a language label enables syntax highlighting and makes the code easier to read.
# PowerShell for loop
for ($i = 0; $i -lt 10; $i++) {
Write-Host $i
}
3. If a code block isn’t available, format code for readability.
If you can’t use a code block, place the code in a paragraph and format it with a monospace font, a light gray background and padding to improve readability.
4. Label code blocks with titles.
Use short titles to give readers context before they review the code (for example, PowerShell for loop processing an array). Add comments within the code to improve readability and help explain what each section does.
5. Follow consistent style conventions.
Use consistent indentation; four spaces is a common standard.
Include descriptive comments for complex operations.
Break long lines to improve readability.
Use meaningful variable names in examples.
Mark Fairlie and Sean Peek contributed to this article. Source interviews were conducted for a previous version of this article.